| Converting a Half-Life Player Model To Quake 2 by Syl^cs. |
|
A few people have been asking how to convert Half-life MDL's to Md2's. Well, here is a tutorial to show you how to do it. Hopefully you can make your way from start to finish with no problems, but if you do have any problems, you can email me at kazaam_nz@hotmail.com Note: I have made a list of things you need... - Q2Modeler 0.9b (most popular versionn) - - Milkshape 1.4 or newer - - Original Halflife model to convert -- - Decent Paint program (I used Photoshhop) - First step: Get the Half-life MDL file you want to convert, and put it in a folder of its own. 
For this tutorial I chose to convert Valve's original Mp5, so thats the model you will see in the pix. 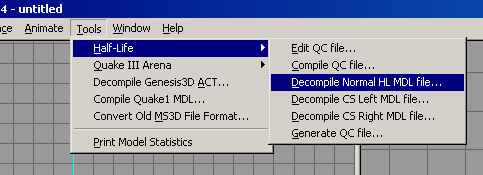
Open Milkshape and go to "Tools->Half-life->Decompile Normal HL Mdl File" Four options come up once you have selected your file. Reference = the actual model, Sequences = the animations, Textures = textures, and .QC file = the file if you want to recompile it as a halflife mdl file. Depending on what you convert, you may need sequences, but if you do your own animation, you only need the reference and textures. 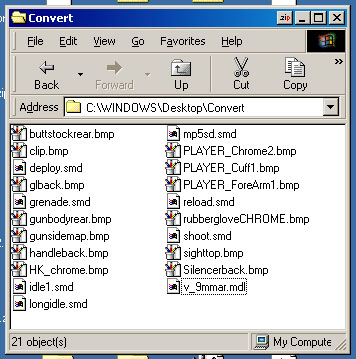
Go to directory where you put the original MDL file. Now there should be some .bmps and some .smds as well. Depending on your options, you may also have some .qc files. Don't worry about them 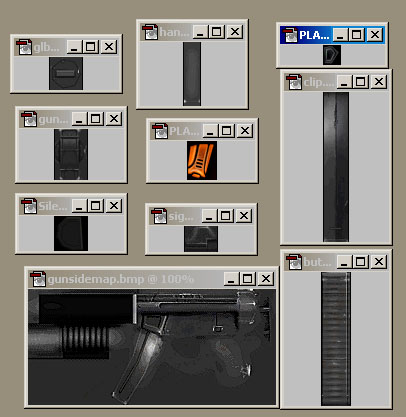
Open Photoshop or some other image editor. Open all of the bmp files into the image prog. We need to get them all onto one skin. Try to keep it as space-useful as possible, i normally try to fit it all into a square. One note, if there are any textures called something with "chrome" in them, they arent needed, as we have no support for chrome textures in md2s. Then, save one copy as a 24-bit TGA, and one as an 8-bit PCX, both named "skin.***". The TGA can be _any_ size, but the PCX however, try to keep it to under 256x256 and also try to keep the numbers to powers (16, 32, 64, etc) 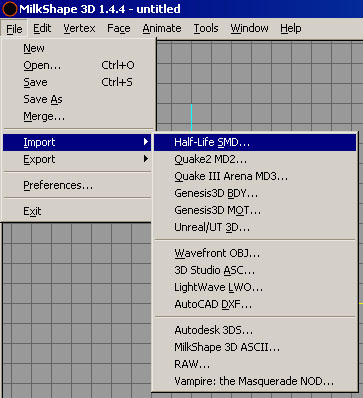
Go back to Milkshape. Go to File->Import->Half-life SMD. Find the one that is named something mentioning "ref" or "reference". If there is only one smd, then open that. If you are unsure, then just go through any smds there are until you find the one. 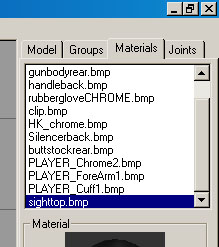
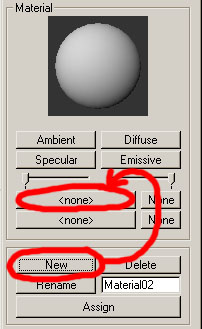
Now, presuming your mdl had more than one skin, go to the "Materials" tab. Delete all of the skins in the list. Click "New" and then click the first "none" button above the labeled buttons. Find your skin.pcx file. It should show up on the sphere. 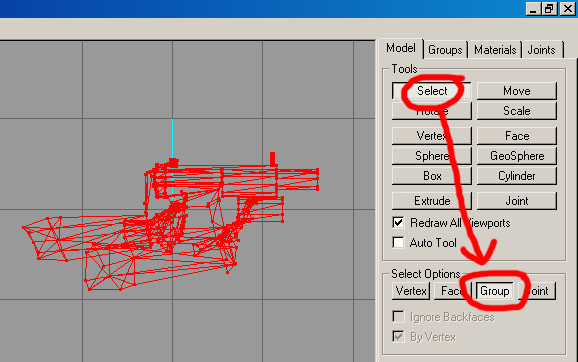
Go back to the "Model" tab, and select "Select" and also click "Group". Then select all your model, so that it is all red. 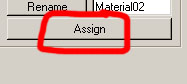
Then go back to the Materials tab, and click "Assign" 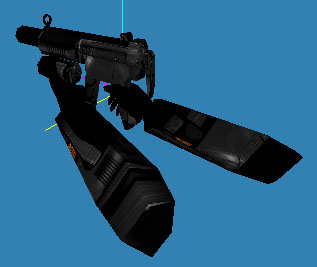
Now your model texture should look screwed up if you have the 3d view on "textured" 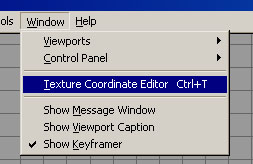
So, now, with your whole model selected, go to Window->Texture Coordinate Editor. 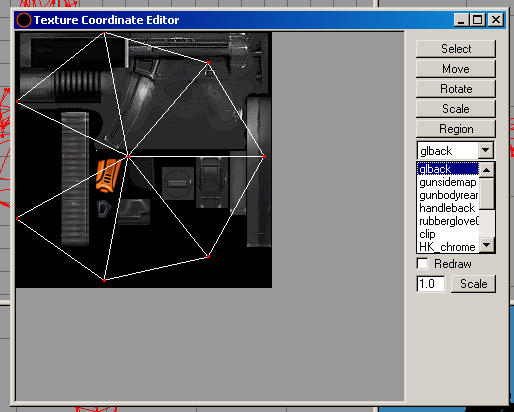
On the list on the right, it should have all the previous textures. Now you just have to go through and line each one up as it goes on your new "compiled" skin. If any of them have no points/triangles, then check if they have chrome in their name, and if so, just leave them and go onto the next name on the list. 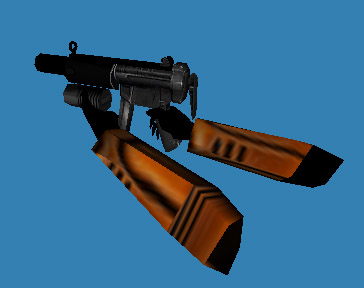
Once you have gone through all of them, your model should look almost normal in the 3d window. Except for possibly being more lo-res. From here, you have three options. The first is to have an animated model from converted animations in the original Half-life mdl file. The second is to create your own animations either in Milkshape or in Q2Mdlr (depending whether you like to animate by vertices or by bones...), and the third is to not make animations at all (the easiest). The third option is only really for w_models and items, which have only one frame of animation (the base frame)... For this tutorial, I am going to do the first option, and show you how to convert the mdl with animations and all. Once you have your mdl all textured correctly, just save a copy as an .ms3d file in case something crashes or likewise. 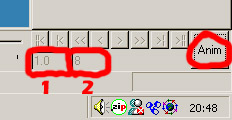
First, click the "Anim" button. Then, the first textbox (labeled "1" above) should equal 1.0 (the first frame). And since you have no other animations yet, type in "1" into the second textbox (labeled "2"). We have just told Milkshape that we are viewing the first frame out of a total of one frame.
Now go back to that "Import Half-life SMD" that we went to before, and select the first animation you want in the model sequence. Normally I would put the Draw Weapon or something to the likes of that first, but since I want to keep this easy to understand we are only going to get the attack animation. 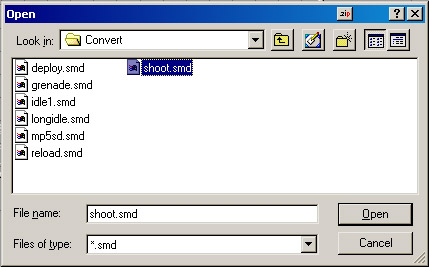
Select the animation you want to import (for me it was the "shoot.smd" anim, it may be different for you...) Just click "Yes" for the message box that comes up. Basically, if you are doing more than one animation, it is just asking whether you want to chuck the animation in to the current point you are at (in the textbox labeled "1" above). Once you have done that, you should be able to slide the slider along and see the model being animated. Now, before exporting to .md2, you have to create the md2.qc file. For this tutorial, i'll show you how to do one set of animations. My model has a total of 7 frames, 1 is just normal pose, and 2-7 are attacking animations. So, go to where you installed Milkshape, and copy the md2.qc file into your directory with all the conversion files. Once you have done that, open it up and follow below. 
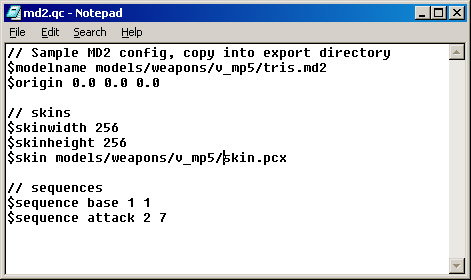
Right, the picture on the left is the one that you are supposed to get with Milkshape. The one on the right is my edited one. As you can see, you just edit everything to suit your model. You can forget about the 2 skins thing, you only really need one skin. Here is an explanation of the things: $modelname This is the filename location to the model. I normally call it tris.md2, stops confusion. $origin You don't need to worry about this, we do this in Q2Mdlr. $skinwidth/$skinheight The skin dimensions for your .pcx (NOT your tga) $skin The path to the skin. Keep all the directorys in it. I put it in the same dir as my tris.md2. $sequence The frames. Use as "$sequence {framesetname} {start frame} {end frame}" Right, now that you have done all that, you can export your model to md2 by going back to Milkshape and going to "File->Export->Quake2 Md2". Then save the tris.md2 into the same dir as your md2.qc. Now you have the hard part done. The easy part in Q2Mdlr is coming up... :) Before you open Q2Mdlr, go into the Quake Directory, and put the model and skin (pcx & tga) into the folders you specified in the md2.qc file. Now when you open Q2Mdlr, go to Options->Directories, and set up the folder you are using. For this, I just made a folder in Quake called HL. So my folder in Q2mdlr was "c:\quake\hl". Once you have done all this, try opening the md2 from the game dir. It should successfully load. Don't worry if the skin is all garbled, that just means its the wrong palette, but since we have the tga, its 24 bit anyway. Now, if you are doing a weapon, you have to get all of the orientation and scale correct. So, get an id model ready (i just use v_shot.mdl, the basic shotgun) and go to File->Choose Reference Model, and select your model. Now, to get your model matching the size and rotation of the Quake one, you'll probably have to rotate it 90 degrees left, as well as scaling it a bit. When you do it though, make sure you click "Effect Frame Range" and go from 0 to the last frame, that way anything you do to line up the models will be done on the whole model. Then, once you have adjusted it to what seems good, export it to md2 (again...) and replace the old one (if you are sure everything is right, otherwise make a backup). Now, all you have to do is the QC code. And once that is done, you should have a perfectly working Half-life model in Quake 1. I am not going to show you how to do that, as there are many QuakeC tutorials out there and a lot probably show how to code custom models. Plus this tutorial is only on converting models from Half-life to Quake 2, nothing about putting them into the game :) Any questions/problems/things I have done wrong/comments, email me at kazaam_nz@hotmail.com and I'll see what I can do. 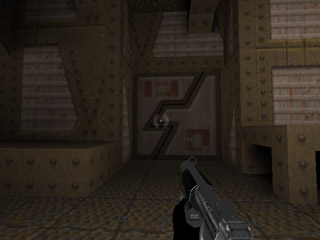
As you can see, the normally chrome parts in Half-life are a plain gray in Quake 1... (*Hint* to all the engine authors, multiple skin part support and/or chrome skins would be great!) |