QERadiant Overview
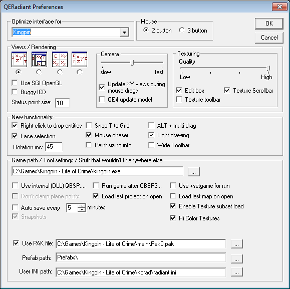
After installing/starting Radiant for the first time, you will be asked to set up your preferences.
You otherwise also can find preferences under Edit and then Preferences...
These are advanced settings that you shouldn't mess with right now. There are a couple of things I should explain to you before closing this window:
- Snapshots (lower left side) tells Radiant to save your work when you select Auto save every X minutes. In case the program crashes, and you lost a lot of editing (because you forgot to save!), you can drag the last snapshot into your maps directory and pick up where you left off. I have my autosave set for every 5 minutes. Keep in mind that you need to occasionally dump this directory, since the files can quickly eat up hard drive space..
- Use PAK File Click on the button to the right of the box and browse to find your KP directory. It should read something like C:\Kingpin\main\Pak0.pak
- Prefab Path is found under Radiant's directory, but you can have it anywhere you want.
- The User INI Path is also found in Radiant's directory. Select radiant.ini
- QE4 Update Model: A legacy option from QERadiant's early days, when mappers wanted to import QE4 maps into Radiant.
- Status Point Size: Determines how large a font to use for the info displayed at the bottom of the editor.
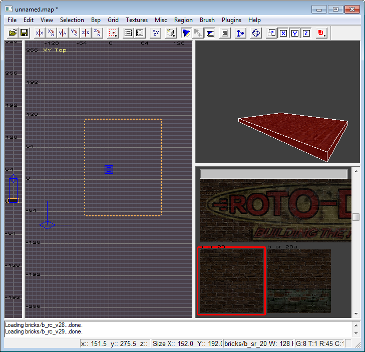
Once you're done setting Radiant's preferences, click OK. Now you are presented with the editor. Note how the main window is white with grid lines. Hard on the eyes, isn't it? Let's change those colors.
Go to Mics->Colors->Themes and pick Black & Green. Much better isn't it? However, if you want to print your maps, you'll need to change it to one of the other themes. You could use Xatrix theme if you use Kpradiant.
Click HELP/ABOUT to verify that you're using the latest version of QER. As of this writing, it should be Build 147 or you use Kpradiant and it standard Build 156x.
Som Radiant got diffrent preferences here a example what Kpradiant does Edit->Prefences:
Mouse Chaser: When you're dragging stuff around the main editing area, if you go beyond the visible boundary, the screen will scroll with the mouse. I usually keep this checked.
Snap T to Grid means that when you size textures on brush faces, the textures will move according to the current grid setting
Light Drawing: If this is not checked, your lights appear as square boxes in the editor.
Paint Sizing Info: Displays coordinates and brush size/location data in the main window.
ALT +multi-drag: Unknown. If you figure this out, gimme a call.
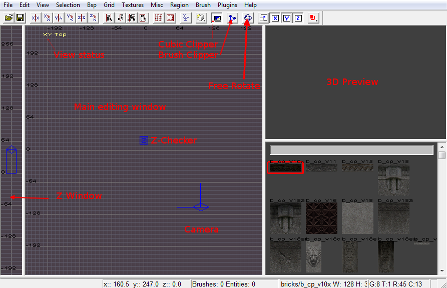
Notice that the editor is divided up into several panes:
- On the far left is a narrow pane for Z (height) info.
- On the bottom you may have a pane showing script text. Drag this down by centering the mouse pointer on the divider bar (it will turn into a double-ended arrow). Click and drag. If you want, you can leave it open enough to show a line or two.
On the upper right is your 3D preview window. It shows how your map will look during construction. Depending on the strength of your graphics card, you may have to adjust some settings to get optimal performance with this window.
When your map starts growing, you should turn on the Cubic Clip button and adjust how far out (zoomed out) the 3D preview window sees. Ctrl-] will bring the the view in; Ctrl-[ will allow more of the map to be seen in the window. Get above your map with the camera (D key) so you can see the effect of these key commands.
If you see Radiant really slowing down, this usually means the Cubic Clip has been turned off or zoomed too far out.
The lower right pane is for displaying textures. As an option, you can preview textures from 10% to 200% their actual size. Go to Textures->Texture Window Scale.
I've labeled the main parts of the editor below. I've also pointed out 3 important buttons:
Cubic Clip: As already mentioned, turning this on and using the Ctrl [bracket] keys determines how much map is viewable in the 3D Preview window.
Brush Clipper: Turning this on (X) allows you to clip one or more selected brushes. Just remember that the shortcut letter X looks like a pair of scissors--snip-snip!
Rotate Selection: This is a "free" rotate. Pressing this button and selecting a brush will allow you to rotate on any axis (dependent on the view) and click/dragging the mouse up and down. Keep in mind that the smaller the grid settings, the smoother the rotation. The keyboard rotate shortcut (R).
Last but not least: You can adjust and size your brushes in ANY window. Enough of the basics. Let's roll up our sleeves and start mapping!


